Origins and cultural Significance of Georgian Bread
Georgian bread is much more than just a staple; it’s a living testament to centuries-old traditions and the heart of Georgian hospitality. In the rustic bakeries of Tbilisi, the aroma of freshly baked bread wafts through the alleyways, inviting a deep fascination with the craft. This bread is a symbol of community and celebration, often baked for special occasions and daily meals alike. Rooted in ancient history, Georgian bread connects families through its ritualistic preparation and sharing, embodying warmth, generosity, and cultural pride.
Exploring Customary Baking Techniques and Ingredients
Crafting authentic Georgian bread demands a unique blend of patience, skill, and respect for heritage. The cornerstone of tradition lies in baking the bread in a tone, a deep, circular clay oven that imbues each loaf with intense heat and an unmistakable smoky aroma. The dough itself is simple yet vital: high-quality flour, water, salt, and a natural leavening agent such as sourdough starter or yeast. Many recipes also call for hand-kneading the dough to achieve the perfect elasticity and texture, a tactile connection that links baker and bread. The intense heat of the tone seals the bread quickly, producing a crisp crust that contrasts beautifully with its soft, chewy interior.
Regional Varieties That Define Georgian bread
Travel across Georgia reveals a mosaic of bread varieties, each reflecting local customs and ingredients. In Eastern Georgia, shotis puri stands out with its canoe-like shape and crackling crust, baked strictly in a tone. Western Georgia offers mchadi, a delightful cornbread that pairs seamlessly with fresh cheese, and nazuki, a subtly sweet, cardamom-scented treat reserved for festive tables.The mountainous regions favor hearty, dense bread to sustain during colder months, while coastal areas incorporate herbs and spices for added flavor complexity. These varieties not only showcase regional diversity but also highlight the versatility and adaptability of georgian bread across cultures and landscapes.
Tips for Enjoying and Pairing Georgian Bread at home
to truly appreciate Georgian bread,serve it warm and fresh. Its aromatic crust and tender crumb invite pairing with traditional accompaniments such as matsoni (a creamy yogurt), fresh sulguni cheese, or vibrant adjika, a spicy pepper paste. For an elevated experience, tear the bread by hand rather than slicing to preserve its texture. Georgian bread also shines alongside hearty stews, grilled vegetables, or as a base for herbaceous spreads like walnut sauce. Store leftovers wrapped in a clean linen cloth to maintain moisture, and lightly reheat in a preheated oven to revive its original texture. Experimenting with local Georgian flavors at home opens a delightful gateway to the country’s rich culinary heritage.
Prep and Cook Time
- Preparation: 20 minutes
- proofing: 1 hour 30 minutes
- Baking: 15 minutes
- Total Time: Approximately 2 hours
Yield
Makes 2 large loaves (serves 6-8)
Difficulty Level
Medium – requires attention to dough texture and baking conditions
Ingredients
- 4 cups all-purpose flour, sifted
- 1 ½ cups warm water (110°F/43°C)
- 2 teaspoons active dry yeast
- 1 teaspoon sugar
- 1 ½ teaspoons salt
- 2 tablespoons vegetable oil (optional, for softer crumb)
Instructions
- Activate the yeast: In a small bowl, combine warm water, sugar, and yeast.stir gently and let it sit until foamy, about 10 minutes. This confirms your yeast is active and ready to leaven.
- Mix and knead the dough: In a large bowl, whisk salt into the flour. Create a well in the center and pour in the yeast mixture and oil. Mix with a wooden spoon until rough dough forms, then turn onto a lightly floured surface.
- Knead vigorously: Knead the dough for 10 minutes until smooth and elastic. Use the heel of your hand, pressing firmly and folding the dough over itself. The dough should be soft but not sticky.
- First proof: Place the dough in a lightly oiled bowl, cover with a damp towel, and let it rise in a warm place until doubled in size, about 1 hour.
- Shape the loaves: Punch the dough down gently to release air. Divide into two equal portions. Shape each into a long, canoe-like oval, stretching slightly by hand without tearing.
- Second proof: Place shaped loaves on a parchment-lined baking sheet or peel if using a stone or clay oven.Cover again and let rise for 30 minutes.
- Bake: Preheat your oven to 475°F (245°C). If possible, place a baking stone or inverted heavy pan inside to mimic a clay oven’s heat.
- Final preparation: Just before baking, use a sharp blade to make shallow diagonal slashes along each loaf. This allows expansion and creates signature ridges.
- Bake for 12-15 minutes: Place the loaves directly on the hot stone or baking sheet. Bake until the crust is deep golden and crisp. Rotate halfway for even browning.
- cool briefly and enjoy: Transfer to a wire rack; allow to cool for 10 minutes before tearing into warm, fragrant slices.
Chef’s Notes
- For an authentic experience mimic the tone by baking on a preheated pizza stone to recreate intense radiant heat.
- Substitute part of the all-purpose flour with whole wheat for a nuttier flavor and heartier texture.
- If dough feels sticky, dust hands lightly rather than adding extra flour, to keep the crumb tender.
- To enhance flavor complexity, allow the dough to ferment overnight in the fridge after the first rise.
- Store leftover bread in a breathable linen bag to prevent moisture buildup and maintain crust crispness.
Serving Suggestions
Slice or tear warm Georgian bread and present it alongside traditional dishes such as lobio (spiced kidney bean stew) or fresh cheeses like sulguni. Garnish with freshly chopped herbs, a drizzle of high-quality Georgian walnut oil, or a side of ajika for a fiery kick. Serve with creamy yogurt dips or bright tomato and cucumber salad to balance textures and flavors.This bread also pairs brilliantly with grilled eggplant or sautéed mushrooms for a vegetarian delight.

| Nutrient | Per Serving (1/6 loaf) |
|---|---|
| Calories | 175 kcal |
| Protein | 5 g |
| Carbohydrates | 35 g |
| Fat | 1.2 g |
For further exploration of Georgian culinary delights, check out our guide to traditional Georgian cheeses. To dive deeper into the history and techniques behind the unique tone oven,visit Britannica’s Georgian cuisine overview.
Q&A
Q&A: Georgian Bread – A Delicious Journey Through Tradition and Taste
Q1: What makes Georgian bread so unique compared to othre traditional breads?
A1: georgian bread is a wonderful reflection of the country’s rich history and diverse culture. What sets it apart is not just the variety of breads but the traditional baking techniques, such as baking in a deep circular clay oven called a tone.The breads often have distinct shapes, textures, and flavors, created by simple yet carefully balanced ingredients like flour, water, salt, and natural yeast. The result is bread that is both rustic and refined, carrying with it the warmth of Georgian hospitality.
Q2: Can you describe some of the most popular types of Georgian bread?
A2: Absolutely! One of the most beloved is shotis puri, a boat-shaped bread with a crispy crust and airy interior, traditionally baked stuck to the walls of the tone. Then there’s mchadi, a dense and hearty cornbread commonly enjoyed alongside cheese or fresh vegetable dishes. Another treasure is lavash, a thin, soft flatbread used to wrap savory or fresh fillings. Each bread tells a story through its texture, shape, and role in Georgian cuisine.
Q3: How is the traditional Georgian bread-baking process unique?
A3: The process is almost ceremonial. The tone oven, made from clay, reaches high temperatures and imparts a distinctive smoky aroma. Dough is often hand-shaped with great care and slapped onto the oven walls, where it bakes quickly to a golden perfection. This method creates a crisp crust hard to replicate in conventional ovens. Baking the breads this way is a skill passed down through generations, often accompanied by storytelling and communal celebration.
Q4: How does Georgian bread play a role in local meals and culture?
A4: Bread is sacred in Georgian culture-it’s a symbol of life and hospitality.At any table,multiple breads might be served alongside fresh cheese,honey,herbs,and seasonal vegetables. Sharing bread is a gesture of friendship and respect. Many traditional Georgian feasts, or supra, begin and end with bread to honor guests.It’s not just food; it’s a cultural cornerstone, connecting families and communities.
Q5: Are there any tips for someone wanting to experience authentic Georgian bread at home?
A5: While replicating the tone oven at home is a challenge, you can get close by using a pizza stone or cast-iron skillet preheated in a hot oven to mimic that radiant heat.Use simple, high-quality flour and allow time for natural fermentation to develop flavor. Shaping the dough into traditional forms, like the elongated boat shape of shotis puri, adds authenticity and fun. Pair your bread with fresh goat cheese or tangy tomato salad to evoke the full Georgian flavor experience.
Q6: What flavors or ingredients complement Georgian bread best in meals?
A6: Georgian bread shines brightest when paired with fresh, vibrant accompaniments-think creamy cheeses like sulguni, earthy eggplant spreads such as badridzani nigvzit, or tangy walnut sauces. Fresh herbs like cilantro and tarragon, crisp seasonal tomatoes, and mild pickled vegetables all bring out the bread’s nuances. These simple but flavorful combinations highlight the bread’s role as a vessel for tastes and textures in Georgian cuisine.
Q7: why has Georgian bread remained a beloved tradition for centuries?
A7: Georgian bread’s endurance is a testament to its deep connection to both the land and the people. It’s more than nourishment; it embodies heritage, community, and identity. The tactile experience of making and breaking bread together continues to foster bonds today, just as it did hundreds of years ago. That timelessness, combined with irresistible flavor and texture, ensures Georgian bread remains a cherished part of the country’s heart and kitchen.
Final Thoughts
As the aroma of freshly baked Georgian bread lingers in the air, we are reminded that this humble staple is much more than nourishment-it is a living testament to centuries of tradition, culture, and community. Each loaf tells a story, from the ancient clay ovens of the Caucasus to modern tables around the world, inviting us to savor not just its rich flavors but the heritage baked within. Whether you’re a curious traveler or a passionate foodie, exploring georgian bread is more than a culinary experience-it’s a delicious journey that connects us to the heart of a vibrant culture, one warm bite at a time.

Crunchy Classics: The Delicious History of Chicken Nuggets offer an irresistible bite that has woven itself into the fabric of global comfort food. From humble home kitchens to the neon-lit counters of fast-food giants, these golden morsels have evolved beyond mere finger food, embodying a perfect blend of crispy textures and juicy tenderness. Their rise in popular culture mirrors the joy we find in simple, nostalgic flavors reinvented through secret culinary techniques and ingredient mastery. Today, let’s delve deep into what defines the perfect chicken nugget, while inspiring you to savor crunchy classics in creative and elevated ways.
Prep and Cook Time
- Prep Time: 20 minutes
- Cook Time: 10-12 minutes
- Total Time: 30-32 minutes
Yield
Serves 4 (about 16-20 nuggets)
Difficulty Level
Easy
Ingredients
- 1 lb boneless,skinless chicken breast,cut into bite-sized pieces
- 1 cup all-purpose flour,sifted
- 1 teaspoon garlic powder
- 1 teaspoon smoked paprika
- 1/2 teaspoon salt
- 1/2 teaspoon ground black pepper
- 2 large eggs,beaten
- 1 cup panko breadcrumbs (for maximum crunch)
- Vegetable oil (for frying; about 2 cups)
- Optional: 1/4 teaspoon cayenne pepper (for a subtle kick)
- 1 tablespoon cornstarch (for a lighter coating)
Instructions
- Prepare the coating stations: In one shallow bowl,mix all-purpose flour with garlic powder,smoked paprika,salt,black pepper,cornstarch, and cayenne pepper if using. In a second bowl,whisk the eggs. In a third bowl, pour the panko breadcrumbs.
- Coat the chicken pieces: Working in batches, dredge each chicken piece first into the seasoned flour mixture, shaking off excess, then dip into the beaten eggs, and finally coat thoroughly with the panko breadcrumbs. For an ultra-crunchy exterior, press the chicken gently into the breadcrumbs to adhere.
- Heat the oil: In a deep skillet or heavy-bottomed frying pan, heat vegetable oil over medium-high heat until it reaches about 350°F (175°C).A kitchen thermometer is ideal for accuracy.
- Fry the nuggets: Carefully place the coated chicken pieces into the hot oil without crowding the pan. Fry for 4-5 minutes per side or until golden brown and cooked through, reaching an internal temperature of 165°F (74°C). Maintain steady heat to avoid soggy results.
- Drain and rest: Transfer cooked nuggets to a wire rack or paper towels to drain excess oil, preserving their crisp texture.
- Serve warm: Pair with your favorite dips or sauces and garnish with fresh herbs or a sprinkle of smoked paprika for color and flavor.
Tips for Success
- Dry chicken pieces: Pat the chicken dry before coating to help the flour mixture stick better.
- Double coating: For extra crunch, dip the chicken back in egg and panko once more before frying.
- oven-baking option: For a healthier twist, bake nuggets at 425°F (220°C) on a parchment-lined tray, flipping halfway through, until golden and crisp (approximately 20 minutes).
- make-ahead: Freeze raw, breaded nuggets on a tray, then store in an airtight bag for up to 1 month. Fry straight from frozen, adding a couple extra minutes to cooking time.
- Ingredient swaps: Use gluten-free flour and breadcrumbs to accommodate dietary needs without sacrificing crunch.
Serving Suggestions
To elevate your crunchy classics experience, serve alongside a vibrant homemade honey mustard dipping sauce or a zesty Sriracha aioli. Garnish with finely chopped parsley or chives for a burst of color. For a balanced plate, pair with crisp coleslaw or air-fried sweet potato fries to add layers of texture and sweetness.transform your chicken nuggets from a familiar snack into a party-ready appetizer or a fun family meal.
| Nutrient | Per Serving (4 nuggets) |
|---|---|
| Calories | 280 kcal |
| Protein | 22 g |
| Carbohydrates | 18 g |
| Fat | 12 g |

Discover more innovative ways to bring beloved classics to your table in our article Crispy Homemade chicken Recipes. For the full science behind perfect breading and frying techniques,the Serious Eats frying guide offers expert insights to sharpen your skills.
Q&A
Q&A: Crunchy Classics – The Delicious History of Chicken Nuggets
Q1: Where did chicken nuggets originate?
A1: Chicken nuggets were born in the culinary creativity of the 1950s and 60s.The concept is often credited to Robert C. Baker, a food science professor at Cornell University, who developed a method to bind ground chicken meat into bite-sized shapes that could be breaded and fried. This innovation transformed chicken from a simple roasted dish into a versatile, crunchy snack loved worldwide.
Q2: What makes a chicken nugget truly classic?
A2: The hallmark of a classic chicken nugget lies in its perfect balance of crispy, golden breading and juicy, tender chicken inside.it’s this delightful contrast-the satisfying crunch teamed with savory, moist meat-that has earned the nugget its iconic status in fast food and home cooking alike.
Q3: How did chicken nuggets become so popular?
A3: Beyond their irresistible taste and portability, chicken nuggets became a cultural phenomenon thanks to fast-food chains like McDonald’s, which introduced Chicken McNuggets in the early 1980s. Their convenient size, kid-kind appeal, and affordability helped nuggets become a global snack sensation.
Q4: Are all chicken nuggets made from whole chicken pieces?
A4: Not always! While some nuggets are crafted from whole, white meat chicken chunks, others use ground chicken mixtures shaped into uniform pieces. The latter approach, pioneered by innovators like Baker, allows for consistent texture and shape, ensuring every nugget delivers that satisfying crunch.
Q5: What role do coatings and breading play in the nugget experience?
A5: The breading is essential-it’s the crunchy armor that seals in moisture and adds texture. Whether it’s panko crumbs, seasoned flour, or a blend of breadcrumbs and spices, coatings elevate the nugget from simple chicken to a complex bite bursting with flavor and crunch.
Q6: How have chicken nuggets evolved over the years?
A6: Chicken nuggets have come a long way from their humble origins. Today, they can be found in various flavors, from spicy buffalo to tangy barbecue, and in forms catering to diverse diets, including gluten-free and plant-based versions that mimic the traditional nugget experience without chicken.
Q7: Why do chicken nuggets hold such nostalgic value?
A7: For many, chicken nuggets are a comfort food rooted in childhood memories-grabbing a quick snack after school or sharing a playful meal with friends and family. Their simple, crave-able qualities have cemented nuggets as an enduring icon in food culture.
Q8: Can you make chicken nuggets at home?
A8: Absolutely! Homemade nuggets let you control every ingredient-from seasoning the chicken to selecting your favorite crunchy coating. Baking or frying your own nuggets can be a fun culinary adventure, yielding fresh, personalized bites of crispy goodness.
Q9: What’s the secret to a perfectly crispy chicken nugget?
A9: Achieving nugget nirvana often boils down to moisture control and frying technique. Patting the chicken dry before breading helps the coating adhere better, and frying at the right temperature ensures a golden crust without greasiness. Alternatively, oven-baking with a light spray of oil can create a crunchy exterior with less mess.
Q10: How do chicken nuggets fit into today’s food scene?
A10: Nuggets embody the perfect blend of convenience and comfort, fitting neatly into busy lifestyles. They continue to evolve with culinary trends-think gourmet dips, artisanal breads, and even international flavor fusions-keeping the humble chicken nugget crunchy, classic, and endlessly delicious.
In Retrospect
From their humble beginnings as a clever way to make chicken more accessible and affordable, chicken nuggets have evolved into a beloved comfort food enjoyed worldwide. These crunchy classics are more than just bite-sized snacks; they represent innovation, cultural shifts, and the enduring appeal of crispy, golden goodness. So next time you dip that perfect nugget into your favorite sauce, take a moment to savor not only the flavor but the fascinating history that made this delicious treat a timeless favorite on plates everywhere.

Cosmic Brownies captivate dessert lovers not only with their deep chocolate richness but with their signature galaxy-inspired charm. Originating as a whimsical twist on the classic brownie, these treats first soared into fame in the late 20th century, captivating taste buds with bursts of colorful candy-coated chocolate that mimic stars scattered across a midnight sky. Their galactic appeal lies in the playful interplay of texture, flavor, and color, making each bite feel like a journey through space itself.Beyond nostalgia, cosmic brownies represent the perfect fusion of creativity and indulgence, inspiring bakers to experiment with space-themed variations that elevate the experience from simple snack to show-stopping constellation on a plate.
Prep and Cook Time
- Preparation: 15 minutes
- Cooking: 25 minutes
- Total Time: 40 minutes
Yield
Makes 16 decadent squares
Difficulty Level
Easy – perfect for beginners and seasoned bakers alike
Ingredients
- 1 cup unsalted butter, melted
- 2 cups granulated sugar
- 4 large eggs
- 1 tsp pure vanilla extract
- 1 cup all-purpose flour, sifted
- 3/4 cup unsweetened cocoa powder, sifted
- 1/2 tsp baking powder
- 1/4 tsp salt
- 1 1/2 cups colorful candy-coated chocolate pieces
- Optional: edible glitter or star-shaped sprinkles for extra cosmic sparkle
Instructions
- Preheat your oven to 350°F (175°C). Grease a 9×13 inch baking pan and line it with parchment paper, allowing some overhang for easy removal.
- In a large mixing bowl, whisk together melted butter and sugar until fully combined and glossy.
- Add the eggs one at a time, whisking thoroughly after each addition to incorporate air and build a rich batter. Stir in the vanilla extract.
- In a separate bowl, sift the flour, cocoa powder, baking powder, and salt together to ensure a smooth batter without lumps.
- Gradually fold the dry ingredients into the wet mixture using a spatula, mixing gently until no streaks remain. avoid overmixing to keep brownies tender.
- Fold in 1 cup of the candy-coated chocolates carefully, reserving the rest for topping.
- Pour the batter evenly into your prepared pan. Sprinkle the remaining 1/2 cup candy-coated chocolate pieces and optional edible glitter or star sprinkles over the top for that cosmic twinkle.
- Bake for 23-25 minutes, or until a toothpick inserted near the center comes out with just a few moist crumbs. Do not overbake to preserve fudgy texture.
- Cool entirely in the pan on a wire rack before lifting out the brownies using the parchment overhang. Slice into 16 squares and serve.
Tips for Success
- Customize your cosmic palette: Swap customary candy-coated chocolates for homemade pastel candy drops or mini white chocolate chips dyed with food coloring for unique variations.
- balance the texture: Adding a handful of finely chopped nuts, such as toasted almonds or pecans, gives a delightful crunch that contrasts beautifully with the chewy brownie base.
- Make it ahead: These brownies keep well at room temperature for up to 3 days, or freeze in an airtight container for up to a month. Thaw at room temperature for easy snacking.
- prevent sinking candies: Toss chocolate pieces in a spoonful of flour before folding in to help them suspend evenly throughout the batter.
- Presentation matters: Glaze the top with a thin layer of chocolate ganache before adding candy and sprinkles for an extra glossy finish and a deeper chocolate kick.
Serving Suggestions
Serve your cosmic brownies fresh with a sprinkle of edible star-shaped sugar crystals or a light dusting of powdered sugar to mimic stardust. For an inviting presentation, place brownies on a dark platter or slate for a celestial backdrop that makes colors pop.
Pair with a scoop of creamy vanilla bean ice cream sprinkled with edible glitter or crushed candy-coated chocolates for an interstellar contrast of warm and cold. Garnish plates with fresh mint leaves or edible flowers to add a hint of earthly freshness against the galaxy theme.
These treats also shine alongside classic hot chocolate, a rich coffee blend, or for a fizzy twist, a sparkling berry soda to complement the sweetness while invoking the effervescence of distant nebulas.
Space-Themed Variations
Elevate your cosmic brownie experience by introducing swirls of vibrant galaxy-inspired frosting before baking or swirling pistachio and raspberry purees into the batter for colorful planetary rings. Use naturally colored beet, turmeric, or butterfly pea powders to tint sections of the batter, creating a marbled cosmic affect.
For an adventurous touch, sprinkle freeze-dried raspberries or crystallized ginger on top-each bite delivers a burst of unexpected flavor to complement the deep cocoa base, while textures mimic meteor showers streaking across the night sky.
| Nutritional Info (Per Serving) | Value |
|---|---|
| Calories | 220 kcal |
| Protein | 3 g |
| Carbohydrates | 28 g |
| Fat | 12 g |

For more celestial dessert ideas, check out our space-themed cake recipes that will transport your taste buds even farther into the cosmos. Additionally, explore the science of chocolate modulation at ScienceDaily to understand what makes such treats so deliciously addictive.
Q&A
Q&A: Cosmic Brownies – A Delicious Journey Through Space-Inspired Treats
Q1: what exactly are Cosmic Brownies, and why are they so popular?
A1: Cosmic Brownies are rich, fudgy chocolate brownies topped with a vibrant layer of colorful candy-coated chocolate bits, reminiscent of sparkling stars in the cosmos. Their playful, eye-catching appearance combined with a moist, chocolaty flavor makes them beloved by kids and adults alike, bringing a little celestial magic to every bite.
Q2: How did the idea of Cosmic Brownies come about?
A2: The concept originally stemmed from a desire to make a classic brownie more imaginative and fun. Inspired by the vastness and beauty of space, bakers envisioned a treat that wouldn’t just taste delicious but also evoke the wonder of twinkling galaxies, shooting stars, and distant planets. The sprinkle toppings represent stars scattered across the night sky-a sweet homage to the universe.
Q3: Can Cosmic Brownies be considered a ‘space-inspired’ dessert beyond just their look?
A3: Absolutely! Beyond their starry appearance, Cosmic Brownies can incorporate creative elements like edible glitter that mimics stardust, or layers of dark and white chocolate to represent lunar landscapes and cosmic contrasts. Some bakers even experiment with flavors inspired by space phenomena-think meteorite crunch textures or comet-tail swirls of caramel.
Q4: Are there different variations of Cosmic Brownies?
A4: Yes! While the classic version features chocolate brownies with candy stars, bakers have reinvented them using ingredients like galaxy-colored frostings, cosmic-shaped sprinkles, or cosmic-inspired marbling with vibrant purples, blues, and blacks. Vegan, gluten-free, or even zero-sugar versions ensure everyone can partake in this stellar indulgence.
Q5: How can I make my own Cosmic Brownies at home?
A5: Start with your favorite brownie recipe or mix for a fudgy base. Once baked, spread a thin layer of chocolate ganache or frosting across the top. Then, sprinkle an array of colorful candy bits, edible glitter, or star-shaped sprinkles to create that cosmic effect. For an extra touch, swirl a bit of shimmering edible dust or drizzle a contrasting frosting color to mimic nebulae.
Q6: Do Cosmic Brownies have any connection to real space travel or astronomy?
A6: While Cosmic Brownies themselves are a whimsical creation, they serve as a fun bridge between food and space enthusiasm. They frequently enough appear in STEM education events or astronomy-themed parties, sparking curiosity about the universe while delighting taste buds.In essence, they’re a sweet ambassador of cosmic wonder!
Q7: What makes Cosmic Brownies a perfect treat for themed occasions?
A7: Their distinctive star-speckled appearance instantly brings a space theme to life, making them ideal for birthdays, school projects, or any festivity with a cosmic twist. They also inspire creativity, encouraging bakers to experiment with colors and shapes that reflect the awe-inspiring beauty of the night sky.
Q8: Can Cosmic Brownies inspire space-themed creativity beyond baking?
A8: Definitely! making and sharing cosmic Brownies frequently enough opens doors for storytelling about the stars, planets, and galaxies. They can be a fun focal point in classrooms to spark creativity about space travel or a tasty reward that encourages young learners to explore scientific mysteries through culinary art.
Q9: Are there any tips for storing and serving Cosmic Brownies to maintain their cosmic charm?
A9: To keep their starry toppings vibrant and crunchy, store Cosmic Brownies in an airtight container at room temperature. If you add frosting or ganache, chilling briefly before serving helps set the layers. Serve on dark plates to make the colors pop, and enjoy them with a sense of wonder-like tasting a piece of the galaxy itself!
Q10: what’s the best way to share the joy of Cosmic Brownies with others?
A10: Present them during a stargazing party, a science fair, or as a surprise galaxy treat packed in themed boxes. Including a little note about the inspiration behind their cosmic design can add extra delight, turning a simple brownie into a conversation starter about the wonders of space. Sharing these treats is a delicious way to spread joy and cosmic curiosity alike!
Final Thoughts
As we wrap up our voyage through the universe of Cosmic Brownies, it’s clear these stellar treats are more than just a dessert-they’re an invitation to explore the sweet side of the cosmos. From their iconic star-speckled appearance to the imaginative ways they inspire space-themed creations, Cosmic Brownies remind us that a little whimsy and a sprinkle of chocolate can make any day feel out of this world. So next time you bite into one of these galaxy-inspired delights, savor not just the rich, fudgy flavor but also the delicious journey they represent-a tasty exploration where science, creativity, and indulgence collide among the stars.

Exploring the Origins and Cultural Significance of Arayes
Arayes Recipe introduces you to a beloved Middle Eastern grilled delight born from centuries of sharing meals around fire pits and family tables. Rooted in Levantine culinary traditions,Arayes originated as a humble street food in Lebanon and surrounding regions,where thin pita bread,stuffed with spiced meat,is grilled to golden perfection. This dish symbolizes warmth, hospitality, and communal enjoyment, frequently enough served during festive gatherings or casual evenings alike.
More than just a snack, Arayes embody a bridge between rustic simplicity and bold flavor-a celebration of aromatic spices blended with tender meat, encased in crispy bread. Mastering this recipe connects you with a vibrant culture that cherishes food as a means of bringing people together.
Mastering the Art of Preparing the Perfect Spiced Meat Filling
At the heart of every exceptional arayes Recipe lies the perfectly seasoned filling. Traditionally, ground lamb or beef melds with finely chopped onions, fresh parsley, and a medley of warm spices like cumin, allspice, and cinnamon. Balancing these elements is key-too much spice overpowers the meat’s natural richness, while too little leaves the flavor flat.
When preparing your filling, gently combine fresh herbs and spices with the ground meat, ensuring just enough moisture from olive oil and lemon juice to bind the mixture without sogginess. Let the filling rest briefly, allowing the flavors to meld and intensify.
Selecting the Ideal Bread and Ingredients for Authentic Flavor
Choosing the right bread transforms your Arayes Recipe from ordinary to exceptional.Traditional pita bread, slightly thick and pocket-less, acts as the perfect canvas, crisping evenly without collapsing under the weight of the filling. Avoid overly soft or thin flatbreads that tend to soak up juices and become mushy.
Fresh ingredients like ripe tomatoes, crunchy cucumbers, and tangy labneh play a crucial role when serving Arayes. These accompaniments not only complement the smoky, spiced meat but also add refreshing textural contrast to each bite.
Grilling Techniques to Achieve Crispy, Juicy Arayes every Time
Grilling is where this dish truly shines. Using a hot grill pan or outdoor grill, sear your stuffed pitas directly over moderate heat.Pressing gently with a spatula or grill press encourages even browning and crunch. Flip carefully to avoid filling spillage and grill until both sides exhibit a deep golden crust, locking in juicy, flavorful meat.
For indoor kitchens,a cast-iron skillet or panini press can replicate these results,just be sure not to rush the cooking-patience yields crispness without drying out the filling.
Prep and Cook Time
- Preparation: 20 minutes
- Cooking: 15 minutes
- Total: 35 minutes
Yield
Serves 4 generous portions
Difficulty Level
Medium – approachable for cooks with some kitchen confidence
Ingredients
- 500g ground beef or lamb, lean and fresh
- 1 medium onion, finely chopped
- 2 tablespoons fresh parsley, finely chopped
- 2 cloves garlic, minced
- 1 teaspoon ground cumin
- 1 teaspoon ground allspice
- ½ teaspoon ground cinnamon
- Salt and freshly ground black pepper, to taste
- 1 tablespoon olive oil
- juice of ½ lemon
- 4 large pita breads, preferably pocket-less and slightly thick
- Optional garnishes: chopped tomatoes, cucumbers, fresh mint, sumac, labneh
Instructions
- Prepare the meat filling: In a large bowl, combine ground meat, finely chopped onion, parsley, garlic, cumin, allspice, cinnamon, salt, and pepper. Add olive oil and lemon juice. Mix gently but thoroughly until well incorporated.
- let the mixture rest: Cover and refrigerate for 10-15 minutes to allow the flavors to meld.
- Prep the pita: Cut each pita bread in half to create pockets. Carefully open each pocket without tearing the bread.
- Stuff the bread: fill each pita half with 3-4 tablespoons of the meat mixture, spreading evenly without overfilling to avoid bursting during grilling.
- Heat the grill: Preheat a grill pan or cast-iron skillet over medium-high heat. Lightly oil the surface if needed to prevent sticking.
- Grill the Arayes: Place the stuffed pita halves on the grill, press gently with a spatula or grill press. Grill each side for 4-5 minutes until golden brown and crispy, flipping carefully to cook evenly. The meat should be cooked through and juicy.
- Rest briefly: Remove from heat and let rest for 2 minutes so juices redistribute inside the filling before cutting or serving.
Tips for Success
- Meat selection: Choose freshly ground beef or lamb with around 15% fat for optimal moisture and flavor.
- Spice balance: Adjust spices gradually-start with less to suit your palate, then increase as desired.
- Bread freshness: Use day-old pita if possible-it grills better and crisps without tearing.
- Grill control: Moderate heat is crucial; too high and the bread burns before the meat cooks,too low and the bread gets soggy.
- Make-ahead: You can prepare the meat filling a day ahead and refrigerate, allowing even deeper spice infusion.
Serving Suggestions
Serve Arayes steaming hot, sliced diagonally to reveal the spiced meat filling. Garnish with freshly chopped parsley and a sprinkle of sumac for an extra tangy pop. Side servings of labneh drizzled with olive oil, crisp cucumber and tomato salad, or a simple tahini sauce amplify the dish’s refreshing contrasts. A wedge of lemon on the side invites an optional zesty squeeze, enhancing the earthy spices and smoky char.
Pair with a chilled mint tea or a sparkling pomegranate drink for an authentically inspired Middle Eastern feast.
| Nutrient | Per Serving |
|---|---|
| Calories | 350 kcal |
| Protein | 28 g |
| Carbohydrates | 30 g |
| Fat | 14 g |

For more middle Eastern inspired recipes, explore our Grilled platters Collection. Learn about the rich history of Levantine food culture hear.
Q&A
Q&A: Arayes Recipe – Flavorful Middle Eastern Grilled delight Unveiled
Q1: What exactly are arayes?
A1: Arayes are a beloved Middle Eastern street food-pita bread stuffed with a savory mixture of spiced ground meat, usually lamb or beef, then grilled to crispy perfection. Think of them as flavorful meat pockets with that irresistible char and a hint of smoky aroma.
Q2: What makes Arayes different from regular stuffed pita or sandwiches?
A2: Unlike ordinary sandwiches, Arayes feature a thin layer of meat spread inside the pita before grilling. This technique infuses every bite with the juiciness of the meat while achieving a delightfully crunchy exterior, creating a perfect contrast of textures and flavors.
Q3: What spices and herbs are typically used in the Arayes meat filling?
A3: The magic lies in a fragrant blend of spices such as ground cumin, paprika, allspice, and a touch of cinnamon. Fresh herbs like parsley, mint, and sometimes a hint of garlic elevate the filling, making it both aromatic and richly flavorful.
Q4: Can Arayes be made with different types of meat?
A4: Absolutely! While ground lamb is traditional, ground beef or a combination of both work wonderfully as well. For a lighter version, some variations use ground chicken or turkey, seasoned with the same spice blend to keep the authentic taste alive.
Q5: Is it necessary to grill Arayes, or can I bake them?
A5: Grilling is preferred as it lends that signature smoky char and crispiness. However, if a grill isn’t available, baking at a high temperature or pan-frying in a skillet can produce tasty results, though the texture might be slightly different.
Q6: What side dishes or accompaniments pair well with Arayes?
A6: Arayes shine alongside classic Middle Eastern sides-think refreshing cucumber and tomato salad, tangy pickled turnips, or a cool dollop of creamy tahini or garlic yogurt sauce. A simple tabbouleh or a bowl of hummus also complements the grilled meat pockets beautifully.
Q7: Are Arayes typically served as a snack, appetizer, or main course?
A7: Versatile and satisfying, Arayes can be enjoyed as a hearty snack or appetizer, but they also make a fantastic main course, especially when paired with sides that balance thier rich, meaty filling.
Q8: How can beginners ensure their Arayes turn out perfectly juicy and crispy?
A8: Key tips include not overstuffing the pita (to prevent sogginess), mixing a little finely chopped onion or a splash of olive oil into the meat for moisture, and grilling over medium-high heat long enough to crisp the bread without burning it.
Q9: Can Arayes be made vegetarian or vegan?
A9: While traditionally meat-centric,creative twists swap the meat for spiced legumes,mushrooms,or textured vegetable protein.Using smoked paprika and liquid smoke can add depth,while herbs and aromatic spices keep the flavor lively and satisfying.
Q10: What’s the best way to serve Arayes for a festive or family gathering?
A10: Slice the arayes into manageable wedges and arrange them on a vibrant platter surrounded by colorful dips and fresh salad. This encourages sharing and nibbling, making it a crowd-pleaser perfect for lively Middle Eastern-inspired feasts.
to Conclude
As the smoky aroma of Arayes lingers in the air and the last bite melts into a tapestry of savory spices, you’ve not just discovered a recipe-you’ve unlocked a flavorful chapter of Middle Eastern culinary tradition. this grilled delight, with its crispy bread embracing a hearty, spiced filling, isn’t merely food; it’s a celebration of culture, craftsmanship, and communal joy. Whether enjoyed as a casual snack or a centerpiece at your next gathering, Arayes invites you to experience the magic where simple ingredients meet bold flavors, creating a mouthwatering journey worth savoring again and again. So fire up the grill, gather your favourite accompaniments, and let this delicious heritage dish transform your kitchen into a vibrant Middle Eastern feast.
Choosing the Perfect Pasta and Filling Combinations for Authentic Flavor
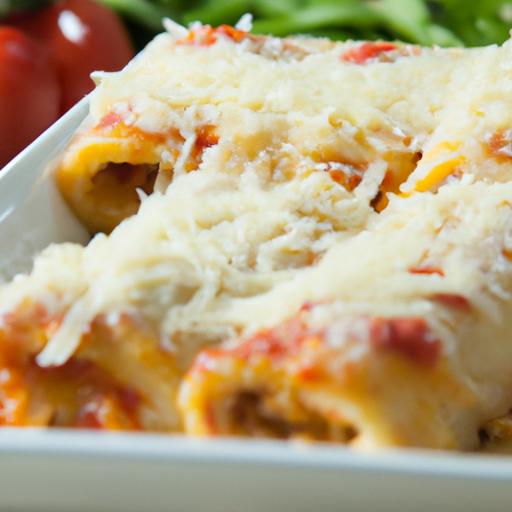
Mastering Baked Manicotti opens the door to a world where simple ingredients transform into a comforting Italian masterpiece. The foundation of this dish lies in selecting the right pasta tubes and combining them seamlessly with a luscious filling that brings authentic flavor to every bite. Traditionally, manicotti pasta is large, tubular, and smooth or ridged-each type lending a slightly different texture and sauce absorption. Opt for fresh manicotti sheets if you have the time to roll your own, or high-quality dried tubes that hold their shape well after baking.
When it comes to fillings, the classic ricotta mixture is a canvas waiting for the perfect balance of creamy richness and vibrant herbs. The secret is combining ricotta with shredded mozzarella and a touch of Parmesan for depth. Fresh basil, parsley, and a hint of garlic elevate the filling to truly authentic Italian bliss. resistance to over-seasoning is key-allow the freshness of the herbs to shine while the cheeses create a velvety texture that fills each tube to luscious perfection.
Crafting the Creamiest Ricotta Mixture with Fresh Herbs and Seasonings
Achieving the creamiest ricotta filling requires both the right ingredients and technique. Start with high-quality whole-milk ricotta, drained if necessary to prevent watery filling, combined with freshly shredded mozzarella for meltability. Incorporate finely chopped fresh herbs such as basil and flat-leaf parsley alongside minced garlic and a pinch of nutmeg for subtle warmth. Season thoughtfully with sea salt and cracked black pepper to enhance-but not overpower-the delicate cheese flavors.
For extra silkiness, mixing in a whole egg binds the filling while contributing to a tender, custardy texture onc baked. The balance of moisture ensures the stuffing remains creamy without becoming runny, maintaining stability inside the pasta shells. This luscious,herbaceous filling is the heart of baked manicotti’s irresistible appeal.
Secrets to Achieving a Golden Baked Cheese Topping Every Time
Nothing signals a perfectly baked manicotti like a shimmering, golden cheese crust crowning the dish. To achieve this coveted topping, layering is crucial. Begin by smothering the pasta tubes in a rich tomato sauce that is neither too watery nor too thick-this helps the cheese melt evenly without burning.
Top your filled manicotti with a generous handful of shredded mozzarella blended with finely grated Parmesan for a cheesy crust that crisps beautifully. For an even deeper golden color and slight crunch, broil the dish for the last 2-3 minutes of baking, watching carefully to prevent scorching. This final touch transforms baked manicotti into an enticing centerpiece teeming with bubbly, golden cheese that invites you to dive in.
Tips for Serving and Pairing Baked Manicotti with Conventional Italian Sides
The full experience of baked manicotti blossoms when paired thoughtfully with classic Italian sides and garnishes that complement each bite. Serve the dish piping hot, garnished with torn fresh basil or a sprinkle of chopped flat-leaf parsley to add freshness and contrast to the rich cheeses.
Traditional pairings include a crisp mixed green salad lightly dressed with lemon and olive oil or a simple array of roasted seasonal vegetables like zucchini, bell peppers, or eggplant. A warm, crusty Italian bread, such as focaccia or ciabatta, is perfect for sopping up any remaining sauce. To bring the meal to a satisfying close, a lightly dressed arugula salad with shaved Parmesan and toasted pine nuts adds peppery notes that balance the creaminess.
For beverage pairings, stick to refreshing options like sparkling water infused with lemon or herbal iced teas to maintain the meal’s bright and vibrant spirit. Bringing together these elements ensures that every baked manicotti dinner feels like a celebration of authentic Italian comfort food.
Prep and Cook Time
- Preparation: 25 minutes
- Cooking: 40 minutes
- Total: 1 hour 5 minutes
Yield
Serves 6 generous portions
Difficulty Level
Medium - approachable for confident home cooks seeking to master Italian classics
ingredients
- 12 manicotti pasta tubes (dried or fresh)
- 2 cups whole-milk ricotta cheese
- 1 ½ cups shredded mozzarella cheese, divided
- ½ cup freshly grated Parmesan cheese, divided
- 1 large egg, lightly beaten
- 2 cloves garlic, minced
- 2 tbsp fresh basil, finely chopped
- 2 tbsp fresh flat-leaf parsley, finely chopped
- 1 tsp sea salt
- ½ tsp freshly ground black pepper
- ¼ tsp ground nutmeg
- 4 cups rich tomato marinara sauce (homemade or high-quality store-bought)
- 2 tbsp extra virgin olive oil
instructions
- Preheat oven to 375°F (190°C). Lightly grease a 9×13 inch baking dish with olive oil.
- Cook manicotti tubes in a large pot of boiling salted water until just al dente, about 5-6 minutes for dried pasta (fresh manicotti sheets should be blanched briefly).Drain and set aside on a drizzle of olive oil to prevent sticking.
- Prepare the ricotta mixture: In a large bowl, combine ricotta, 1 cup mozzarella, ¼ cup Parmesan, beaten egg, minced garlic, basil, parsley, sea salt, black pepper, and nutmeg. Stir gently until creamy and well blended.
- Fill the manicotti: Using a small spoon or piping bag, carefully fill each manicotti tube with the cheese mixture, taking care to avoid tearing the pasta.
- Spread 1 ½ cups of marinara sauce evenly over the bottom of the baking dish. Arrange the filled manicotti tubes side by side in the sauce.
- Top the tubes with remaining marinara sauce. Sprinkle with the remaining mozzarella and Parmesan cheeses, ensuring even coverage.
- Bake uncovered for 35-40 minutes until the sauce bubbles and the cheese topping is melted and golden.
- Broil for 2-3 minutes if necessary to achieve a deep golden, slightly crisp cheese topping-watch closely to prevent burning.
- remove from oven, cool slightly, garnish with fresh basil or parsley, and serve warm.
Chef’s Notes
- For optimal ricotta texture, place ricotta in a fine mesh strainer over a bowl and allow excess whey to drain for 30 minutes before mixing.
- To make ahead: assemble the manicotti in the baking dish, cover tightly, and refrigerate for up to 24 hours before baking.
- Substitute part of the ricotta with cottage cheese for a lighter filling, though texture will vary slightly.
- Adding finely chopped sautéed spinach or mushrooms enriches the filling with vibrant earthy notes.
- If marinara sauce is too acidic,balance with a pinch of sugar or add sautéed onions to your base sauce.
Serving Suggestions
- Plate baked manicotti with a fresh arugula salad tossed in lemon vinaigrette to cut through richness.
- Add a side of grilled or roasted seasonal vegetables like zucchini, eggplant, or bell peppers for color and balance.
- Garnish with torn fresh basil leaves and a drizzle of high-quality extra virgin olive oil for an aromatic finish.
- Serve with warm crusty Italian bread, perfect for dipping into tangy, leftover sauce.
| Nutrient | Per Serving |
|---|---|
| Calories | 480 kcal |
| Protein | 28 g |
| Carbohydrates | 45 g |
| Fat | 18 g |

For further inspiration on italian pasta dishes,consider exploring our Ultimate Guide to Lasagna. to deepen your understanding of pasta types and pairings, visit Pasta.com.
Q&A
Q&A: Mastering Baked Manicotti - A Delicious Italian Classic Guide
Q1: What exactly is baked manicotti?
A: Baked manicotti is a beloved Italian-American dish featuring large tubular pasta shells stuffed generously with creamy ricotta cheese, spinach, herbs, and sometimes sautéed vegetables or ground meats like beef or turkey. The filled pasta is than covered in rich tomato sauce, sprinkled with cheese, and baked until bubbly and golden-a comforting, heartwarming meal perfect for any occasion.
Q2: how do I prevent the manicotti shells from breaking while filling them?
A: Handling those delicate tubes can be tricky! To prevent cracking, always boil the pasta just until al dente, not too soft. Drain and cool them slightly before filling to reduce fragility. Using a piping bag or a resealable plastic bag with a corner snipped off makes stuffing easier and gentler on the shells than spooning the filling in.
Q3: Can I make manicotti ahead of time?
A: absolutely! You can assemble the manicotti a day ahead and keep it covered in the refrigerator. When ready to bake, just add a little extra sauce on top to keep the pasta moist and bake until hot and bubbly. This makes manicotti an excellent dish for entertaining or busy weeknights.
Q4: What variations of filling can I experiment with?
A: Creativity is the secret ingredient! Traditional fillings frequently enough include ricotta mixed with spinach and herbs like basil or parsley. But you can also try sautéed mushrooms for an earthy depth, roasted butternut squash for a hint of sweetness, or replace some ricotta with creamy cheeses like mascarpone or mozzarella. For a protein boost, ground turkey, chicken, or lentils work wonderfully.
Q5: What kind of tomato sauce should I use?
A: A simple, well-seasoned marinara is the perfect partner to the rich filling. Whether homemade or store-bought, look for a sauce with fresh garlic, ripe tomatoes, and a touch of Italian herbs. If you love a bit of spice, a pinch of crushed red pepper flakes adds a subtle kick without overpowering the dish.
Q6: Any tips for achieving that perfect golden crust on top?
A: The key is the cheese topping! A generous sprinkle of shredded mozzarella mixed with a hard cheese like Parmesan creates a beautifully golden, bubbly finish. For extra browning, place the manicotti under the broiler for 1-2 minutes at the end-just watch closely so it doesn’t burn.
Q7: How do I know when my baked manicotti is perfectly done?
A: Look for these signs: the sauce should be bubbling around the edges, the cheese on top melted and lightly browned, and the pasta tender throughout. You can also insert a knife or fork into the middle; it should glide in easily without resistance, indicating the pasta and filling are cooked through.
Q8: Can manicotti be made gluten-free or dairy-free?
A: Yes! Many stores sell gluten-free manicotti shells, or you can use gluten-free pasta tubes or even homemade crepes as a wrap.For dairy-free versions, substitute ricotta with plant-based cheese alternatives like cashew ricotta, and use dairy-free mozzarella-style shreds. Just ensure your tomato sauce is free of hidden dairy ingredients.
Q9: What sides pair well with baked manicotti?
A: Sence manicotti is rich and hearty, lighter sides balance the meal beautifully. A crisp arugula salad with lemon vinaigrette, steamed green beans with garlic, or oven-roasted vegetables like zucchini and bell peppers make excellent companions. A simple Italian herb bread or garlic knots can also complement the indulgence.
Q10: How do I store and reheat leftover manicotti?
A: Leftovers store well in an airtight container in the refrigerator for 3-4 days. To reheat, cover with foil and warm in the oven at 350°F (175°C) until heated through to preserve the flavors and prevent drying out. Microwaving works too but may result in a softer texture. for longer storage, manicotti freezes well-just wrap tightly and reheat from frozen in the oven.
Mastering baked manicotti means embracing its comforting layers of flavor while having fun with your fillings and sauces. With these tips, your kitchen is ready to recreate this Italian classic with confidence and flair! Buon appetito!
Insights and Conclusions
As you close the oven door on your perfectly baked manicotti, you’re not just serving a meal-you’re sharing a piece of Italian tradition, crafted with your own hands.Mastering this classic dish is more than following a recipe; it’s about understanding the harmony of flavors, the art of layering cheese and sauce, and the joy of creating something comforting and timeless. So whether you’re a seasoned chef or a kitchen novice, let this guide be your invitation to explore, experiment, and most importantly, savor every cheesy, saucy bite. buon appetito-and may your baked manicotti always come out golden, bubbling, and unforgettable.
Exploring the Origins and Cultural Meaning of Manicotti
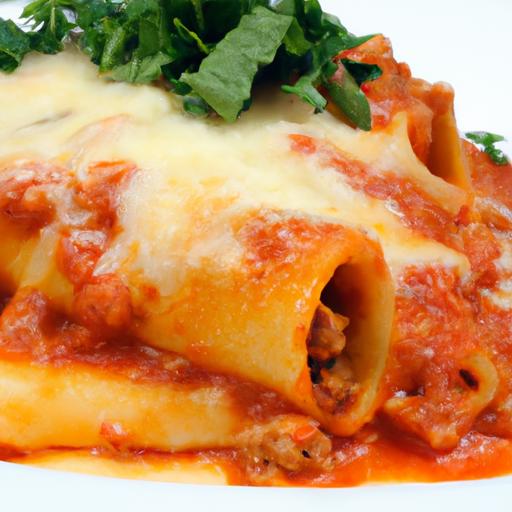
Manicotti Magic begins with a celebration of one of Italy’s most beloved stuffed pastas. Rooted deeply in Southern italy’s rich culinary heritage, manicotti originally emerged as a humble yet elegant way to transform simple ingredients like pasta dough, ricotta, and fresh greens into a comforting, celebratory dish. The name “manicotti” means “big sleeves,” a nod to the tubular pasta shape that acts as a vessel for the luscious fillings inside. Over centuries, this dish has evolved beyond family Sunday dinners to become an expression of Italian-American ingenuity and comfort food culture. Its layers of creamy filling and vibrant sauce symbolize warmth, community, and the joy of sharing food made with care.
Mastering the Art of the Perfect Ricotta and Spinach Filling
At the heart of every fantastic manicotti dish is a filling that balances creaminess with texture and freshness. The magic lies in combining ricotta cheese, fresh spinach, and subtle aromatics to create a filling that is simultaneously silky and bright. Fresh baby spinach should be blanched and squeezed thoroughly to remove excess moisture-this prevents the filling from becoming soggy. Adding grated Parmesan cheese introduces a subtle nutty depth, while a hint of freshly grated nutmeg and cracked black pepper elevates the flavor complexity. Achieving the perfect consistency-soft enough to pipe yet firm enough to hold shape inside the manicotti tubes-is an art that transforms eating into celebration. For added richness, a touch of eggs binds the filling, ensuring each bite is cohesive and satisfying.
choosing the Right Sauce to Elevate Your Manicotti Experience
The choice of sauce sets the tone for your manicotti’s final character. While conventional Italian-American versions frequently enough rely on a robust marinara, experimenting with velvety béchamel or a bright pomodoro sauce opens new doors of taste. A bright, herby tomato sauce infused with garlic, basil, and a hint of chili flakes creates harmony with the creamy filling, offering a zesty counterpoint that excites the palate.Alternatively, a lush roasted red pepper sauce or a light garlic-infused olive oil drizzle can offer modern riffs on classic themes, adding layers of intrigue without overpowering the filling. Always ensure your sauce is slightly thicker than usual to cling lovingly to the manicotti, preventing the dish from running watery during baking.
Tips and Tricks for Baking manicotti to Golden Perfection
Baking manicotti is where visual delight meets textural bliss. The pasta should tenderize just enough to melt the filling’s creaminess with the sauce’s vibrant flavors without collapsing. Pre-cooking the pasta tubes until al dente is key-overcooked shells can tear during stuffing, while undercooked pasta will resist softness in the oven.To prevent dryness, nestle each stuffed tube snugly in your baking dish, generously smother with your chosen sauce, and sprinkle a blend of mozzarella and Parmesan cheese on top for that signature golden crust. Cover the dish with foil for the first 30 minutes to trap steam, then remove it near the end to allow the surface to crisp beautifully. Letting the manicotti rest for at least 10 minutes post-baking enhances flavor melding and makes serving easier, preserving those perfect cylindrical shapes. The final presentation, garnished with fresh basil or chopped parsley, offers a feast for both eyes and taste buds.
Prep and Cook Time
- Readiness Time: 30 minutes
- Cooking Time: 40 minutes
- Total Time: 1 hour 10 minutes
yield
Serves 6 generous portions
Difficulty Level
Medium – perfect for home cooks comfortable with stuffing pasta and layering flavors
Ingredients
- 12 manicotti pasta tubes
- 2 cups ricotta cheese, well-drained
- 2 cups fresh baby spinach, blanched and squeezed dry
- 1 cup shredded mozzarella cheese
- ½ cup grated Parmesan cheese
- 1 large egg
- 1 garlic clove, minced
- ½ teaspoon freshly grated nutmeg
- Salt and freshly ground black pepper, to taste
- 3 cups tomato marinara sauce (preferably homemade or high-quality store-bought)
- Fresh basil leaves for garnish
- Olive oil (for sautéing spinach and drizzling)
Instructions
- Cook the manicotti: Bring a large pot of salted water to a boil. Add manicotti tubes and cook until al dente, approximately 6-7 minutes. Drain carefully and lay them flat on a towel to cool and prevent sticking.
- Prepare the spinach: Heat a drizzle of olive oil in a sauté pan over medium heat. add minced garlic and cook until fragrant, about 30 seconds. Add the blanched spinach for 1-2 minutes to combine flavors. Remove from heat and let cool. Then finely chop spinach.
- Make the filling: In a large bowl, combine ricotta, chopped spinach, Parmesan cheese, egg, nutmeg, salt, and pepper. Mix gently but thoroughly until a creamy,cohesive filling forms.Adjust seasoning as desired.
- Stuff the manicotti: Using a piping bag or small spoon, carefully fill each manicotti tube with the ricotta-spinach mixture. Try not to overfill to avoid splitting the pasta.
- Assemble the dish: Preheat oven to 375°F (190°C).Spread 1 cup of marinara sauce evenly at the bottom of a baking dish. Arrange stuffed manicotti side by side in a single layer. Pour remaining sauce generously over the top, then sprinkle with shredded mozzarella and extra Parmesan.
- Bake covered: Cover the dish tightly with aluminum foil and bake for 30 minutes to allow flavors to meld and pasta to soften.
- Finish baking uncovered: Remove the foil and bake for an additional 10 minutes, or until cheese is melted and golden brown.
- rest and garnish: Let the baked manicotti rest for 10 minutes before serving.garnish with fresh basil leaves and a light drizzle of high-quality olive oil if desired.
Tips for Success
- use fresh ricotta for a creamy texture; if too watery, strain it through cheesecloth overnight to remove excess liquid.
- Do not skip squeezing moisture from spinach-too wet a filling will affect both texture and baking quality.
- If manicotti tubes are unavailable, wide lasagna noodles can be boiled, cut into sheets, and rolled with filling.
- For a nut-free variation, omit nutmeg or substitute with a pinch of ground cinnamon or dried oregano for a different aromatic note.
- Make the filling and stuff manicotti ahead of time, then refrigerate covered until ready to bake.
Serving Suggestions
For an elegant presentation, serve manicotti on warm plates with a sprinkle of extra Parmesan and freshly cracked pepper. pair with a light green salad tossed in lemon vinaigrette to balance richness. A side of roasted seasonal vegetables or garlic bread makes for a classic Italian-inspired feast. garnishing with bright basil leaves or finely chopped flat-leaf parsley adds a fresh pop of color that invites eager forks.

| Nutrient | Per Serving |
|---|---|
| Calories | 420 kcal |
| Protein | 22 g |
| carbohydrates | 45 g |
| Fat | 15 g |
For a related dive into classic italian pastas, explore our article on Ricotta Stuffed Shells: A Comfort Food Staple. To understand more about the cultural journey of Italian pasta dishes, visit Britannica’s Pasta History Overview.
Q&A
Q&A: Manicotti Magic – A Delicious Journey Through Stuffed Pasta
Q: what exactly is manicotti, and what sets it apart from other stuffed pasta dishes?
A: Manicotti is a classic Italian-American pasta tube, typically large and ridged, designed to be stuffed with a flavorful filling before being baked to bubbly perfection. Unlike smaller stuffed pastas like ravioli or tortellini, manicotti’s generous size allows for hearty, layered fillings, making each bite a satisfying experience of textures and tastes.
Q: What are the traditional fillings used in manicotti?
A: The heart of manicotti lies in its filling. Traditionally, it’s a luscious blend of ricotta cheese, mozzarella, parmesan, and fresh herbs such as basil and parsley. Some recipes incorporate wilted spinach or sautéed mushrooms to add earthiness and color. The filling is creamy, savory, and often accented with garlic or onion for depth.
Q: How can one customize the filling to elevate the dish without veering away from tradition?
A: Creativity shines in customizing manicotti fillings! For a vegetarian twist, roasted vegetables like butternut squash, zucchini, or eggplant blend beautifully with cheese.Herbs like oregano or thyme can add subtle aromatic layers. some chefs add a hint of lemon zest for brightness. The key is balancing richness with fresh, vibrant flavors to complement the pasta.
Q: Should manicotti be boiled before stuffing or baked directly?
A: Classic manicotti tubes are boiled just until al dente, making them pliable enough to stuff without tearing. After filling, the manicotti are nestled into a baking dish with a generous coating of marinara or béchamel sauce, then baked until the cheese is melted and the top is lightly golden.
Q: Can manicotti be made with homemade pasta?
A: Absolutely! Homemade pasta dough, rolled out slightly thicker, lends a tender yet sturdy shell perfect for holding fillings. Rolling fresh dough into tubes might require some patience, but the resulting texture and flavor bring artisanal charm to the dish. Using semolina flour can add a pleasant bite reminiscent of Italian pizzerias.
Q: What sauces pair best with manicotti?
A: Manicotti loves a cozy sauce.Classic marinara, with its bright tomatoes and garlic, is a timeless partner. For a creamier option,béchamel or a light alfredo sauce complements the cheese filling beautifully. Fresh basil or a sprinkle of crushed red pepper flakes can enhance the overall profile, creating a balance between rich and refreshing.
Q: Are there any tips for assembling manicotti so the filling stays intact during baking?
A: To keep fillings from spilling, a gentle touch is essential. Using a piping bag or a sturdy plastic bag with the corner snipped off helps in stuffing neatly. Be careful not to overfill-leave just enough room to prevent bursting. And don’t skimp on the sauce; a sufficient layer around each tube keeps the pasta moist and helps seal in the filling.
Q: What makes manicotti magic a perennial favorite in Italian-American kitchens?
A: Manicotti’s magic comes from its comforting combination of simplicity and indulgence. It’s a dish that invites gatherings, sharing, and creativity. The tender pasta,creamy filling,and rich sauce blend into a soulful meal that feels like a warm hug on a plate.whether served on weeknights or special occasions, its timeless appeal continues to enchant all ages.
In Summary
As we close the chapter on our delicious journey through the world of manicotti, it’s clear that this humble stuffed pasta is much more than just a meal-it’s a celebration of tradition, creativity, and comfort all rolled into one. From the rich, creamy filling to the savory sauce that blankets each tender tube, manicotti invites us to savor every bite with joy and recognition. Whether you’re a seasoned chef or a curious kitchen adventurer, embracing the magic of manicotti opens up endless possibilities to customize and share this timeless dish.So next time you seek a perfect blend of flavors and textures, remember: the magic of manicotti is always ready to transform your table into a feast of happiness.
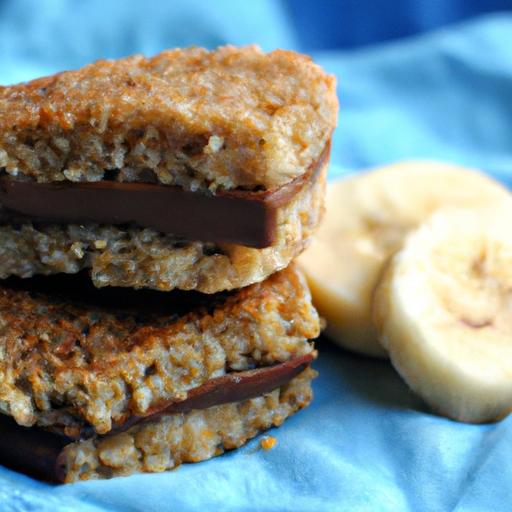
Delicious PB Chocolate Banana Rice Cakes create a harmonious symphony of textures and flavors, marrying the crunch of perfectly toasted rice cakes with the creamy richness of peanut butter and the decadent sweet touch of ripe bananas and chocolate. This delightful snack transcends the ordinary, offering an easy yet notable way to indulge your sweet tooth while keeping your snack game wholesome and satisfying.
Prep and Cook Time
- Preparation: 10 minutes
- Assembly: 5 minutes
- Total Time: 15 minutes
Yield
Serves 4 – perfect for sharing or a satisfying solo snack.
Difficulty Level
Easy – ideal for beginners and busy home cooks alike.
Ingredients
- 4 plain rice cakes, light and crisp
- 1/3 cup smooth peanut butter, room temperature for easy spreading
- 2 ripe bananas, sliced thinly to enhance natural sweetness
- 2 tablespoons dark chocolate chips or finely chopped dark chocolate (70% cacao or more)
- 1 teaspoon honey (optional, to enhance sweetness)
- 1/2 teaspoon ground cinnamon, for warmth and aroma
- A pinch of sea salt, to balance flavors
Instructions
- Prepare the rice cakes: For an elevated crunch, lightly toast the rice cakes in a dry pan over medium heat for 1-2 minutes each side, watching carefully to avoid burning. This step enhances the texture and adds a subtle nutty aroma.
- Spread the peanut butter: Using a small spatula or knife,generously spread smooth peanut butter over each rice cake,covering the surface evenly for rich,creamy contrast against the crisp base.
- Add banana slices: Select bananas that are vividly yellow with a few brown freckles, indicating perfect ripeness for natural sweetness and velvety softness.Arrange slices in a single layer on top of the peanut butter, ensuring each bite delivers a fruity burst.
- Sprinkle chocolate chips and cinnamon: Scatter dark chocolate chips over the banana slices for a bittersweet pop. Then, lightly dust ground cinnamon to infuse a hint of warmth and complement the peanut butter’s earthiness.
- Drizzle honey and sprinkle sea salt: Optional yet transformative, a fine drizzle of honey adds shine and extra sweet depth. A tiny pinch of sea salt enhances all flavors, making the combination addictive.
- Serve promptly: Enjoy these rice cakes fresh for the best contrast between crisp and creamy textures. If preparing in advance, store the components separately to avoid sogginess.
Tips for success
- Texture matters: The rice cakes should be thin and crisp,ideally plain or lightly salted for a balanced flavor. Avoid flavored rice cakes that may clash with the peanut butter or banana.
- Peanut butter choice: Smooth varieties spread more easily, but crunchy peanut butter adds delightful bursts of nutty crunch – a wonderful variation to try.
- Banana ripeness: Overripe bananas become too mushy, compromising texture. Slightly spotty bananas offer natural sweetness without losing bite.
- Chocolate alternatives: Dark chocolate lends sophistication, but feel free to switch to cacao nibs for crunch or dairy-free chocolate chips for vegan options.
- Make-ahead tip: Prepare peanut butter-coated rice cakes without banana slices and store air-tight. Add bananas just before serving to maintain freshness.
Serving suggestions
Present these treats on a rustic wooden board or a sleek ceramic plate to enhance their vibrant colors and textures. Garnish with fresh mint leaves or a light sprinkle of shredded coconut for an extra pop of color and flavor. Pair with a chilled glass of almond milk or your favorite herbal tea to create a perfectly balanced snack or dessert experience.

| Nutrient | Per Serving |
|---|---|
| Calories | 220 kcal |
| Protein | 7 g |
| Carbohydrates | 28 g |
| Fat | 9 g |
| Fiber | 4 g |
Explore More
For more wholesome snack ideas, check out our Healthy Peanut Butter Snack Recipes. Also, learn about banana ripening science and how it affects sweetness at ScienceDaily.
Q&A
Q&A: Delicious PB Chocolate Banana Rice Cakes – Easy Homemade recipe
Q1: What makes these PB Chocolate Banana Rice Cakes a perfect snack?
A1: These rice cakes perfectly balance creamy peanut butter, rich chocolate, and sweet banana, creating a snack that’s as satisfying as it is nutritious. They offer a delightful mix of textures-crunchy, soft, and gooey-all in one bite. Plus, they’re easy to make at home with simple ingredients you probably already have!
Q2: Can I use a different nut butter rather of peanut butter?
A2: Absolutely! Almond butter, cashew butter, or sunflower seed butter all work wonderfully. Just keep in mind that each will slightly change the flavor profile, so pick your favorite or whatever you have on hand.
Q3: Is it better to use ripe or overripe bananas for this recipe?
A3: Overripe bananas are your best friend here-they’re sweeter, mash more easily, and add natural moisture to the rice cakes, helping bind everything together while giving that luscious banana flavor.
Q4: What kind of chocolate works best for these rice cakes?
A4: Semi-sweet or dark chocolate chips melt beautifully and provide a rich contrast to the sweet banana and nutty peanut butter. You can even try cacao nibs for a crunchier, less sweet option if you prefer.
Q5: Are these rice cakes gluten-free?
A5: Yes! As long as you use certified gluten-free rice cakes and check your other ingredients,this recipe is naturally gluten-free,making it an excellent choice for those with gluten sensitivities.
Q6: How long do these homemade rice cakes stay fresh?
A6: Stored in an airtight container in the fridge, they usually stay fresh for up to 4-5 days. For longer storage, you can freeze them-just pop one out for a quick, satisfying snack anytime!
Q7: Can I make these rice cakes vegan and dairy-free?
A7: Definitely! Use dairy-free chocolate chips and a vegan-kind peanut butter, and you’re all set. This snack is naturally plant-based aside from the chocolate, so it’s easy to adapt for any diet.
Q8: What’s the easiest way to melt the chocolate for this recipe?
A8: Microwave chocolate in short bursts of 20 seconds, stirring in between to prevent burning. Alternatively, melt it gently over a double boiler for smooth, glossy chocolate perfect for drizzling or mixing.
Q9: Can I add other toppings or mix-ins to the rice cakes?
A9: Feel free! Chopped nuts, chia seeds, shredded coconut, or even a sprinkle of cinnamon can add exciting layers of flavor and texture. Be creative and customize your rice cakes to suit your taste buds.
Q10: Are these rice cakes suitable for kids’ lunchboxes?
A10: Yes, they’re a nutritious, mess-free treat packed with energy and wholesome ingredients. Keep them chilled, and they make a fun and satisfying snack for kids and adults alike!
Enjoy making-and munching on-these easy, delicious PB Chocolate Banana Rice Cakes that transform simple ingredients into pure delight!
To Conclude
Whipping up these delicious PB Chocolate Banana Rice Cakes is a delightful way to transform simple ingredients into a snack that’s both satisfying and wholesome. Whether you’re fueling a busy day,treating yourself after a workout,or craving a guilt-free indulgence,this easy homemade recipe has you covered. With the perfect harmony of peanut butter, rich chocolate, and ripe banana atop crunchy rice cakes, you’re just a few minutes away from a treat that’s as nutritious as it is tasty. So next time hunger strikes, skip the store-bought snacks and embrace this homemade delight-your taste buds and your body will thank you!
unlocking the Nutritional Powerhouse: Key Benefits for energy and Digestion
Power Up Mornings with Greek yogurt, the creamy, tangy delight celebrated worldwide for its rich texture and astounding health benefits. Originating from the Mediterranean,Greek yogurt has become a beloved staple for those seeking nourishment that fuels both body and mind. I vividly remember the first time I experienced the velvety smoothness of authentic Greek yogurt atop fresh summer berries during a sunny Athens morning-it was a revelation, a perfect harmony of taste and vitality that jumpstarted my day like never before.
With its concentrated protein content, probiotics, and low sugar profile, Greek yogurt stands out as the ultimate morning fuel. It not only delivers sustained energy but also supports optimal digestion, making it a holistic start to your busy day.
Prep and Cook Time
- Readiness: 10 minutes
- Cook Time: 0 minutes (no cooking required)
Yield
- Serves 2 hearty portions
Difficulty level
- easy – perfect for fast, wholesome breakfasts
Ingredients
- 1 ½ cups Greek yogurt (full-fat or 2% for creaminess)
- 1 cup mixed fresh berries (blueberries, strawberries, raspberries)
- 2 tbsp raw honey or better yet, local wildflower honey
- ¼ cup crunchy granola (nut-free if preferred)
- 2 tbsp chia seeds (for omega-3 boost)
- 1 tbsp toasted sliced almonds (optional, for texture)
- A pinch of ground cinnamon
- 1 tsp freshly grated lemon zest (to brighten)
Instructions
- Start by scooping the Greek yogurt into two medium-sized bowls, creating a creamy base that’s both rich and satisfying.
- Gently fold in the chia seeds and a pinch of ground cinnamon for subtle warmth and texture, enhancing every spoonful.
- Layer the fresh mixed berries evenly on top.The vibrant colors and natural sweetness make this breakfast visually stunning and nutrient-packed.
- Drizzle honey generously over the fruit to infuse gentle floral notes and natural sweetness, perfectly balancing the tang of the yogurt.
- sprinkle the crunchy granola and toasted almonds last to add a delightful crunch that contrasts the smooth creaminess beneath.
- Finish with a sprinkle of freshly grated lemon zest, adding a citrusy aroma that awakens the senses and ties the flavors together seamlessly.
- Serve promptly, or cover and refrigerate for up to 2 hours if prepping ahead.Enjoy chilled for a refreshing start.
Chef’s Notes: Tips for Success
- For an ultra-smooth texture, opt for full-fat Greek yogurt, which offers better mouthfeel and richness.
- If you prefer dairy-free options, high-protein plant-based yogurts can be swapped in, but Greek yogurt’s probiotics are unmatched.
- Experiment with seasonal fruits like peaches or pomegranate seeds for exciting variations throughout the year.
- Make a layered parfait by alternating yogurt, fruit, and granola in a glass jar-perfect for aesthetics and portion control.
- To maximize probiotics, choose plain, unflavored Greek yogurt with live and active cultures - check the label carefully.
Serving Suggestions
Present your bowl of delight with a small sprig of fresh mint or edible flowers for a pop of color. Pair it with a steaming cup of green tea or a freshly pressed juice for an invigorating breakfast spread that feels both indulgent and healthful. This simple yet decadent dish is ideal for leisurely weekend mornings or a quick midweek energy boost.
| Nutrient | Per Serving |
|---|---|
| Calories | 320 kcal |
| Protein | 23 g |
| Carbohydrates | 32 g |
| Fat | 7 g |
Discover more creative breakfast inspirations and nutritional insights in our Healthy Breakfast Ideas collection.For detailed science-backed benefits of Greek yogurt, visit British Nutrition Foundation.

Q&A
Q&A: Power Up Mornings – Delicious Benefits of Greek Yogurt Breakfast
Q1: What makes Greek yogurt a great choice for breakfast?
A1: Greek yogurt is a powerhouse of protein, which helps keep you full and energized throughout the morning. Its creamy texture and tangy flavor make it a delicious base for sweet or savory toppings. plus, its rich in probiotics that support gut health, making it a double win for digestion and sustained energy.
Q2: How does Greek yogurt compare to regular yogurt in terms of nutrition?
A2: Greek yogurt undergoes straining, which removes excess whey, resulting in a thicker texture and higher protein content than regular yogurt. It also typically has less sugar and fewer carbohydrates, making it an excellent choice for those looking to maintain balanced blood sugar levels or increase protein intake.
Q3: Can Greek yogurt help with weight management?
A3: absolutely. Thanks to its high protein content, Greek yogurt promotes satiety, meaning you feel fuller longer and are less likely to reach for mid-morning snacks. This can definitely help manage calorie intake naturally. Additionally, its calcium content may assist in fat metabolism.
Q4: What are some creative ways to enjoy Greek yogurt for breakfast?
A4: The possibilities are endless! Try layering Greek yogurt with fresh berries, nuts, and a drizzle of honey for a parfait that’s both nutritious and visually appealing.For savory enthusiasts,mix Greek yogurt with herbs like dill and chives,then pair with whole-grain toast or roasted veggies. Adding a spoonful of nut butter or chia seeds can pack in extra nutrients, too.
Q5: Is Greek yogurt suitable for people with lactose intolerance?
A5: Many people with mild lactose intolerance tolerate Greek yogurt better than milk or regular yogurt because the straining process reduces the lactose content. Tho, it varies from person to person, so it’s best to start with small amounts and see how your body responds.
Q6: How does eating Greek yogurt in the morning affect energy levels?
A6: Greek yogurt provides a balanced combination of protein, fat, and carbohydrates, offering a steady release of energy. This balance helps prevent the mid-morning energy slump that often comes from sugary or carb-heavy breakfasts.
Q7: Can Greek yogurt boost workout performance if eaten in the morning?
A7: Definitely! The high protein content in Greek yogurt aids muscle repair and growth,making it an excellent pre- or post-morning workout fuel. Paired with some fruit or whole grains, it replenishes glycogen stores and supports recovery.
Q8: How can incorporating Greek yogurt into breakfast support gut health?
A8: Greek yogurt is rich in probiotics – beneficial bacteria that help maintain a healthy gut microbiome. A balanced gut can improve digestion, enhance nutrient absorption, and even bolster immune function, setting a strong foundation for overall wellness.
Q9: What should I look for when choosing Greek yogurt at the store?
A9: Opt for plain,unsweetened greek yogurt to avoid added sugars.Check the ingredient list – the shorter, the better. greek yogurt made with just milk and live active cultures is ideal. From there, you can customize the flavor naturally with fruits, nuts, or spices.
Q10: can children benefit from having Greek yogurt for breakfast?
A10: Absolutely! Greek yogurt’s creamy texture and mild tang make it kid-pleasant, and its protein and calcium support growing bodies and strong bones. Adding fun toppings like colorful fruit or a sprinkle of cinnamon can make breakfast both nutritious and exciting for little ones.
In Summary
As the sun rises and a new day beckons, fueling your morning with the creamy goodness of Greek yogurt isn’t just a delicious choice-it’s a smart one. Packed with protein, probiotics, and a wealth of nutrients, this humble breakfast hero powers up your day, supporting everything from digestion to sustained energy. So next time you reach for your morning meal, remember: a spoonful of Greek yogurt isn’t merely breakfast-it’s the start of a healthier, happier you. Embrace the tangy delight and let your mornings shine brighter than ever before.
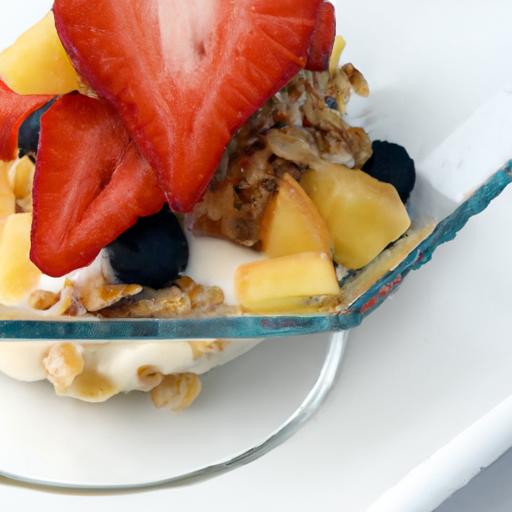
Fuel Your Morning: Delicious baked protein Pancake Bowls
Fuel Your Morning: Delicious Baked Protein Pancake Bowls bring together the perfect balance of science and taste to kickstart your day with lasting energy. These fluffy, nutrient-dense pancakes are not just a treat-they’re crafted with intention to fuel your body and mind, harnessing the power of protein to regulate blood sugar, boost metabolism, and keep you energized through busy mornings. Inspired by traditional baked goods but elevated with a modern, health-conscious twist, this recipe is a food stylist’s dream come true-inviting vibrant colors, textures, and flavors right on your plate.
Prep and Cook Time
- Preparation: 10 minutes
- Cooking/Baking: 20 minutes
- total Time: 30 minutes
Yield
Serves 4 hearty pancake bowls
difficulty Level
Easy – Perfect for beginners and busy mornings alike
Ingredients
- 1 cup oat flour (ground from rolled oats for a wholesome base)
- 1/2 cup vanilla whey protein powder (choose a clean, low-sugar option)
- 1 tsp baking powder (for a light and fluffy texture)
- 1/2 tsp baking soda (reacts beautifully with the yogurt)
- 1/2 tsp cinnamon (adds warmth and complexity)
- 1/4 tsp sea salt (balances sweetness)
- 1 cup Greek yogurt (full-fat or 2% for creamy moisture)
- 2 large eggs (for structure and protein power)
- 1/4 cup melted coconut oil (adds richness and subtle nuttiness)
- 1 tbsp pure maple syrup (natural sweetness and depth)
- 1 tsp vanilla extract (aromatic finishing touch)
- 1/4 cup unsweetened almond milk (to adjust batter consistency)
Instructions
- Preheat your oven to 350°F (175°C). Lightly grease a 9-inch round cake pan or line it with parchment paper for effortless removal and even baking.
- In a large bowl, whisk together oat flour, protein powder, baking powder, baking soda, cinnamon, and salt. This dry mix forms the fluffy backbone of your protein pancakes.
- In a separate medium bowl, beat the eggs until frothy. Combine with Greek yogurt, melted coconut oil, maple syrup, vanilla extract, and almond milk. Stir until smooth and creamy.
- Slowly fold the wet ingredients into the dry using a spatula, mixing just until combined.Avoid overmixing-this is key to achieving that tender crumb.
- Pour batter evenly into the prepared pan, smoothing the top gently with a spatula.
- Bake for 18-22 minutes or until a toothpick inserted in the centre comes out clean.The edges should look golden and firm, while the center remains soft and springy.
- Remove from oven and let cool for 5 minutes. Slice into wedges or crumble into bowls depending on your presentation preference.
- Top your protein pancakes with your favorite energizing toppings (see below) and serve instantly for the freshest texture.
Tips for Success: Crafting the Perfect Batter
- use oat flour for a naturally gluten-free option with a mild, nutty flavor; be sure to grind your oats finely for the smoothest batter.
- Protein powder choice dramatically affects texture-whey works best for fluffiness, while plant-based may result in denser pancakes.
- Greek yogurt is your secret weapon for moisture and tanginess-full-fat varieties create richer pancakes.
- Don’t overmix the batter; a few lumps are okay and ensure lightness after baking.
- If batter seems too thick, add almond milk one teaspoon at a time until pourable but not runny.
- For extra lift, let the batter rest for 5 minutes before baking, allowing baking soda and powder to activate fully.
- To freeze, bake fully, cool completely, then wrap slices individually in parchment and foil before popping in a freezer-safe bag.
Top Toppings to Elevate Your Protein Pancake Bowl Experience
- Fresh mixed berries (blueberries, raspberries, and sliced strawberries add vibrant color and antioxidants)
- chopped toasted nuts (almonds, walnuts, or pecans for satisfying crunch and healthy fats)
- Greek yogurt drizzle (extra creaminess and tang)
- Natural nut butters like almond or peanut butter for richness and a dose of good fats
- Raw honey or pure maple syrup for gentle sweetness
- Edible flowers or mint leaves to create a visually dazzling bowl
- Chia seeds or hemp hearts sprinkled on top for texture and omega-3 boost
Serving Suggestions
To create an inviting and instagram-worthy protein pancake bowl, place a warm wedge of your baked pancake in a beautiful ceramic bowl. Layer generously with a dollop of Greek yogurt and scatter fresh berries around. Drizzle a thin stream of maple syrup, then finish with chopped nuts and chia seeds for texture contrast. Add a sprig of mint or a couple of edible flowers to brighten the presentation. Not only will this bowl fuel your morning, but it will awaken your senses with every bite.

| Nutrient | Per Serving (1/4 recipe) |
|---|---|
| Calories | 320 kcal |
| Protein | 22 g |
| Carbohydrates | 28 g |
| Fat | 12 g |
For a deeper dive into energizing breakfasts packed with protein, check out our High Protein Breakfast Recipes. Want to learn more about how protein fuels your metabolism? Visit Healthline’s expert insights.
Q&A
Q&A: Fuel Your Morning with Delicious Baked Protein Pancake bowls
Q1: What exactly is a baked protein pancake bowl?
A1: Imagine your favorite fluffy pancakes, but upgraded and baked into a hearty, wholesome bowl brimming with protein power. Instead of stacking individual pancakes, the batter is poured into a bowl-shaped dish and baked until golden and tender-creating a convenient, nutrient-packed morning meal that’s easy to customize.
Q2: Why choose baked protein pancake bowls over traditional pancakes?
A2: Traditional pancakes ofen rely on butter and syrup for flavor and can be carb-heavy with little protein. Baked protein pancake bowls offer a balanced alternative-packed with muscle-loving protein, fiber-rich ingredients, and healthier fats. Plus, as they’re baked rather than fried on a griddle, they require less oil, making them lighter and perfect for a sustained energy boost.
Q3: What are some key ingredients in these protein pancake bowls?
A3: The magic lies in combining protein powder (whey, plant-based, or egg white), whole grain flours like oat or almond flour, eggs or flax seeds as binders, and natural sweeteners such as honey or mashed bananas. Optional add-ins like chia seeds, berries, or cinnamon elevate the flavor and nutrition even further.
Q4: How do you customize a baked protein pancake bowl?
A4: The beauty is in personalization! Swap toppings like fresh fruit, nut butter, Greek yogurt, granola, or dark chocolate chips. You can also infuse the batter with spices like nutmeg or vanilla extract, or throw in shredded coconut or pumpkin puree. it’s your canvas for a morning masterpiece tailored to your taste and nutrition goals.
Q5: Can these pancake bowls help with weight management or fitness goals?
A5: absolutely! thanks to their high protein content and fibrous ingredients, baked protein pancake bowls promote satiety, helping curb mid-morning cravings. They provide stable energy release which supports physical activity and muscle recovery. When combined with a balanced diet and exercise,they make a smart morning choice for anyone aiming for fitness or weight control.
Q6: What’s the best way to prepare these bowls for busy mornings?
A6: Prep in advance! Bake a batch at the start of the week, then refrigerate or freeze individual bowls. In the morning, simply reheat in the microwave or oven and top with your favorite fresh ingredients. It’s a delicious time-saver that fuels your day with minimal effort.
Q7: Any tips for making the perfect baked protein pancake bowl texture?
A7: To keep the texture tender and fluffy, don’t overmix the batter-fold ingredients gently.Use ripe bananas or applesauce for moisture, and ensure you bake at a moderate temperature (around 350°F/175°C) until a toothpick comes out clean. Adding a bit of baking powder helps with rise and fluffiness, giving you that perfect bowl every time.
Q8: Where did the idea for baked protein pancake bowls come from?
A8: Inspired by the desire to reinvent breakfast classics with a healthful twist,bakers and nutrition enthusiasts sought a way to combine protein-rich ingredients with the comforting familiarity of pancakes. baking them in a bowl shape makes breakfast both innovative and practical-highlighting the trend of nourishing meals that fit seamlessly into modern, busy lifestyles.
Fuel your mornings with these delicious baked protein pancake bowls-because a powerful day starts with a powerful breakfast!
Key Takeaways
As you embark on your mornings with these delicious baked protein pancake bowls, you’re not just fueling your body-you’re setting the tone for a day full of energy, focus, and flavor. Packed with wholesome ingredients and a satisfying protein punch, these bowls transform the classic breakfast into a nourishing ritual that’s as delightful to eat as it is good for you.So next time the morning rush calls, remember: a balanced and beautiful start is just a bowl away. Breakfast has never been this inspiring-or this delicious.
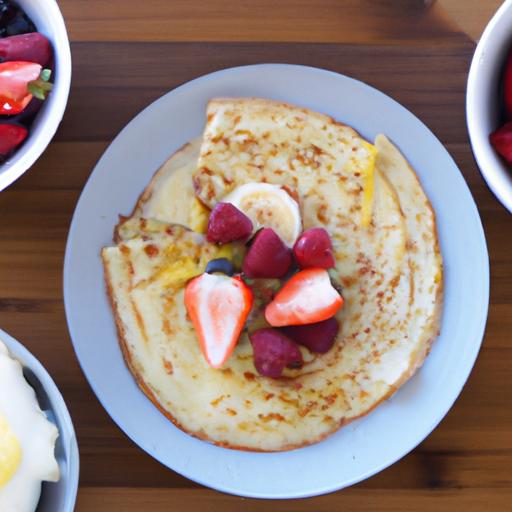
Savory & Simple: Delicious Ground Turkey Recipes to Try Today
Ground turkey is a versatile and lean protein that can transform your meals with bold flavors and satisfying textures. Whether you’re craving something zesty, comforting, or exotic, mastering a handful of flavorful ground turkey marinades unlocks endless possibilities. These marinades not only infuse the meat with vibrant tastes but also keep it moist and tender, making every bite unforgettable. From tangy citrus blends inspired by Mediterranean cuisine to smoky, spice-laden mixes from global kitchens, ground turkey elevates your cooking to irresistible new heights.
Prep and Cook Time
- Planning: 10 minutes
- Marinating: 30 minutes to 2 hours (optional but recommended)
- Cooking: 15-20 minutes
- Total Time: 40 minutes to 2.5 hours
Yield
Serves 4 generous portions, perfect for a family dinner or meal prep.
Difficulty Level
Easy to Medium – Ideal for home cooks looking to create quick recipes packed with flavor without intricate techniques.
Ingredients
- 1 lb ground turkey (preferably lean, 93% lean or higher)
- 1/4 cup soy sauce (or tamari for gluten-free)
- 2 tablespoons olive oil
- 2 cloves garlic, minced
- 1 tablespoon fresh ginger, grated
- 1 tablespoon honey or maple syrup
- 1 teaspoon smoked paprika
- 1/2 teaspoon ground cumin
- 1/2 teaspoon red pepper flakes (optional for heat)
- Juice of 1 lime
- Salt and pepper to taste
- Fresh cilantro or parsley for garnish
Instructions
- Combine the marinade: in a medium bowl, whisk together soy sauce, olive oil, minced garlic, grated ginger, honey, smoked paprika, cumin, red pepper flakes, and lime juice until well emulsified.
- Marinate the ground turkey: Add the ground turkey to the bowl and gently toss until fully coated. Cover with plastic wrap and refrigerate for at least 30 minutes, or up to 2 hours for deeper flavor infusion.
- Heat the pan: Place a large non-stick skillet over medium heat. Once hot, add the marinated turkey, breaking it up with a spatula.
- Sauté the meat: Stir frequently and cook until the turkey is fully browned and no longer pink, about 8-10 minutes. For best results, let it brown without stirring too often to develop a slight crust.
- Season and finish: Taste and season with salt and pepper as needed. Remove from heat and sprinkle with fresh cilantro or parsley.
- Serve warm: use promptly in one-pot meals, tacos, salads, or wraps for an effortless, savory experience.
Tips for Success
- Marinate longer: For even richer flavor, marinate the ground turkey overnight. The acids and spices will tenderize the meat beautifully.
- Let it rest after cooking: cover the skillet for 2 minutes post-cooking to let the juices redistribute, keeping every bite juicy.
- Substitution ideas: swap honey for agave syrup to make this recipe vegan-kind by using plant-based ground meat alternatives.
- Avoid over-stirring: Allow the turkey to brown undisturbed for 2-3 minutes per side to build flavor through caramelization.
- Make ahead and freeze: Cooked marinated ground turkey freezes perfectly for up to 3 months-perfect for quick weeknight meals.
Serving suggestions
This flavorful ground turkey pairs beautifully with fluffy jasmine rice, zesty avocado slices, and a crisp green salad tossed in a light vinaigrette. For a fun, casual dinner, spoon into warm tortillas and top with crunchy slaw and a dollop of Greek yogurt. Another delicious option is layering it over roasted vegetables sprinkled with fresh herbs and a squeeze of fresh lime for brightness. To visually impress, garnish with vibrant cilantro sprigs and thin slices of red chili for a pop of color and gentle heat.

| Nutrient | Amount (per serving) |
|---|---|
| Calories | 220 kcal |
| Protein | 28 g |
| Carbohydrates | 5 g |
| Fat | 9 g |
Enjoy exploring more creative uses of ground turkey with our Healthy Turkey Meals Collection that adds variety and nutrition to your culinary repertoire. For additional grounding on the health benefits of lean poultry, visit the Healthline guide on ground turkey nutrition.
Q&A
Q&A: Savory & Simple – Delicious Ground Turkey Recipes to Try Today
Q1: why choose ground turkey over other meats?
A: Ground turkey is a versatile, lean protein that offers a lighter option to beef without sacrificing flavor. It’s perfect for those wanting to enjoy hearty meals while keeping things healthy and lower in fat. Plus, its mild taste adapts beautifully to a wide array of seasonings and cuisines.
Q2: What makes a ground turkey recipe “savory and simple”?
A: The magic lies in balancing rich,savory flavors with straightforward techniques. Using fresh herbs, spices, and umami-packed ingredients like garlic, soy sauce, or tomatoes can elevate ground turkey from plain to palate-pleasing, all without complicated steps or long cooking times.
Q3: Can ground turkey be used in classic recipes that call for ground beef?
A: Absolutely! Ground turkey works wonderfully in classics like meatballs, tacos, chili, and burgers. While it’s leaner than beef, making it less juicy, adding moisture-rich ingredients like onions, grated vegetables, or a touch of olive oil can create that satisfying texture and flavor.
Q4: What are some must-try ground turkey recipes featured in your article?
A: A few crowd-pleasers include:
- Turkey and spinach meatballs simmered in a savory tomato sauce
- Zesty turkey lettuce wraps bursting with fresh herbs and crunch
- Classic turkey burgers with a smoky chipotle mayo
- Ground turkey chili with beans and a hint of smoky paprika
Q5: How can I ensure my ground turkey dishes stay moist and flavorful?
A: Avoid overcooking-which dries out lean turkey-and incorporate ingredients that add moisture.Breadcrumbs soaked in broth, eggs, finely chopped veggies, or a splash of sauce can work wonders. Also, seasoning well from the start is key; ground turkey absorbs flavors beautifully but can taste bland without enough spices.
Q6: Are ground turkey recipes suitable for busy weeknights?
A: Definitely! Ground turkey cooks quickly, making it ideal for fast, wholesome dinners. Many recipes can be whipped up in under 30 minutes, helping you bring a savory, nutritious meal to the table without fuss.
Q7: Can ground turkey be frozen for later use?
A: Yes! Ground turkey freezes well raw or cooked. Portion it before freezing to make thawing and using in recipes hassle-free. Just be sure to thaw it safely in the fridge overnight before cooking.
Q8: Any tips for seasoning ground turkey to maximize flavor?
A: Think bold and aromatic. Fresh garlic, onion, cumin, smoked paprika, fresh herbs like parsley or cilantro, and a dash of soy or Worcestershire sauce can transform plain turkey into a flavor powerhouse. Don’t be shy to experiment with spices from various cuisines to keep your meals exciting.
Ready to elevate your dinner routine? With these tips and recipes, ground turkey can easily become your kitchen’s new secret weapon-savory, simple, and simply delicious!
In Retrospect
Whether you’re seeking a lighter twist on classic comfort foods or aiming to add a protein-packed punch to your weekday dinners, ground turkey offers a versatile canvas for culinary creativity. from bold Mediterranean-inspired meatballs to cozy skillet casseroles, these savory and simple recipes invite you to explore new flavors without sacrificing ease or nutrition. So next time you’re at the grocery store, grab a lean pound of ground turkey and let these delicious ideas inspire your kitchen adventures-your taste buds (and your waistline) will thank you!