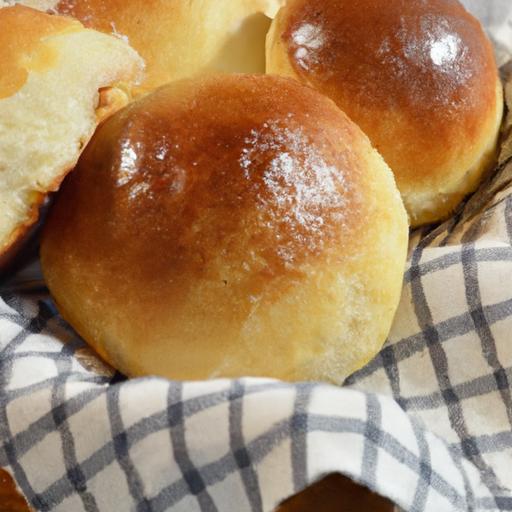
There’s something undeniably enchanting about the pillowy embrace of freshly baked bread, but few loaves capture that magic quite like fluffy milk bread rolls. Soft to the touch, subtly sweet on the palate, and irresistibly tender with every bite, these rolls have earned a beloved spot on breakfast tables and dinner plates around the world. Rooted in a tradition that blends gentle baking techniques with rich, creamy ingredients, fluffy milk bread rolls offer more than just nourishment-they invite a moment of simple comfort and delight. Join us as we explore what makes these golden little clouds so special, how their sweet softness comes to life, and why they continue to charm bread lovers everywhere.
Fluffy Milk Bread Rolls are the epitome of tender, slightly sweet perfection that melts in your mouth. Originating from Japanese bakeries, these cloud-like rolls have captured the hearts of home bakers and food lovers worldwide with their irresistible softness and subtle sweetness. Combining a rich milk-infused dough with carefully mastered kneading and proofing techniques, these rolls elevate everyday bread into an remarkable treat. Whether enjoyed fresh for breakfast or as an accompaniment to your favourite meal, their delicate crumb and glossy crust make every bite unforgettable.
Prep and Cook Time
- Planning: 30 minutes
- First Proofing: 1 hour 15 minutes
- Shaping: 15 minutes
- Second Proofing: 45 minutes
- Baking: 18-20 minutes
- Total Time: Approximately 3 hours
Yield
Makes 12 fluffy milk bread rolls
difficulty Level
Intermediate – perfect for bakers with some experience in yeast bread making
Ingredients
- 3 ½ cups (440g) all-purpose flour, sifted
- ¼ cup (50g) granulated sugar
- 1 tsp fine sea salt
- 2 tsp instant yeast
- ½ cup (120ml) whole milk, warmed to 110°F (43°C)
- ¼ cup (60ml) heavy cream, room temperature
- 1 large egg, room temperature
- 4 tbsp unsalted butter, softened
- Extra milk for brushing (optional, for a shiny crust)
Instructions
- Activate the yeast: In a small bowl, combine the warm milk with sugar and instant yeast. Let it sit for 5-7 minutes until bubbles form on the surface, signaling active yeast.
- Prepare the dough: In a large mixing bowl or stand mixer, combine sifted flour and salt, mixing gently to distribute. Add the yeast mixture, heavy cream, and egg. Stir until a shaggy dough forms.
- Knead to develop gluten: Using a stand mixer fitted with a dough hook or by hand, knead the dough for about 10 minutes until it becomes smooth, elastic, and slightly tacky. Gradually add softened butter in small increments during the last 5 minutes of kneading to incorporate fully.
- First proof: Lightly grease a large bowl and place the dough inside, covering it tightly with plastic wrap or a damp kitchen towel. Let it rise in a warm place for 1 hour to 1 hour 15 minutes, or until doubled in size.
- Shape the rolls: Gently deflate the dough on a lightly floured surface. Divide it into 12 equal portions (roughly 65-70g each). Shape each piece into a smooth ball by tucking edges underneath and rotating with cupped hands for surface tension.
- Arrange and second proof: Place the shaped rolls spaced evenly in a greased 9×13-inch baking pan or on a lined baking sheet for separate rolls. Cover loosely and let proof for 45 minutes, until puffy and nearly doubled.
- Preheat oven: While the rolls proof, preheat your oven to 350°F (175°C).
- Brush and bake: Optional: Lightly brush the tops with milk for a golden sheen. Bake rolls for 18-20 minutes or until the tops are golden brown and the rolls sound hollow when tapped gently.
- Cool slightly: Transfer rolls to a wire rack to cool for at least 15 minutes before serving to maintain fluffy texture while preventing sogginess.
Tips for Success
- Milk temperature: Ensuring the milk is warm-but not hot-is key for yeast activation without killing the yeast.
- Kneading technique: Use the windowpane test to check gluten growth: stretch a small dough piece until translucent without tearing.
- Butter incorporation: Soften butter to room temperature; cold butter resists mixing and may result in denser rolls.
- Proofing environment: Create a warm, draft-free spot by preheating your oven for 1 minute, turning it off, and placing the dough inside with the door ajar.
- Make ahead: After shaping, freeze the dough balls on a tray. Wrap each frozen roll tightly and bake directly from frozen, adding extra baking time.
- Substitutions: Use whole wheat pastry flour for a nuttier flavor, but expect slightly denser rolls.
Serving Suggestions
These fluffy milk bread rolls shine best when enjoyed warm and fresh but are versatile beyond the breakfast table. Serve with a pat of high-quality butter and a drizzle of honey for a simple yet indulgent start to your day. For a savory touch, accompany with homemade herb butter or use as sandwich buns paired with roasted vegetables and grilled chicken.
For an elegant presentation, dust with powdered sugar or brush lightly with honey syrup for a subtle glaze. Pair these rolls with hearty soups,creamy curries,or a fresh salad to balance sweetness and softness with savory components.
| Nutrient | Per Roll (approx.) |
|---|---|
| Calories | 150 kcal |
| Protein | 4 g |
| Carbohydrates | 24 g |
| Fat | 4 g |
For another delightful bread choice, explore our Classic Brioche Buns recipe, which pairs wonderfully with savory fillings.
Learn more about the science of yeast and dough development from this comprehensive resource on King Arthur Baking Company.

Q&A
Q&A: Fluffy Milk Bread Rolls – Soft, Sweet, and Simply Irresistible
Q1: What makes milk bread rolls so irresistibly soft and fluffy compared to regular bread?
A: The secret lies in the unique combination of ingredients and technique. Milk bread rolls incorporate tenderizing agents like milk and sometimes a bit of butter, which add richness and moisture. The dough is often enriched and gently kneaded, creating a fine, airy crumb. Additionally, using tangzhong (a cooked flour-water paste) in the dough helps retain moisture, resulting in bread that stays soft for days.
Q2: Can I make milk bread rolls without using a stand mixer?
A: Absolutely! While a stand mixer speeds up the kneading process, hand-kneading is perfectly doable. The key is patience-knead the dough vigorously for about 10 to 15 minutes until it’s smooth and elastic. You can also use the stretch-and-fold method during proofing to develop gluten and achieve that soft, fluffy texture.
Q3: What’s the role of milk in these rolls? Why not just use water?
A: Milk enriches the dough in multiple ways.It adds natural sugars and fats, which tenderize the crumb and contribute to a subtle sweetness and golden crust. Milk proteins also improve browning during baking, giving the rolls an inviting color and slightly richer flavor compared to water-based breads.
Q4: How long can I store fluffy milk bread rolls and still enjoy their softness?
A: When stored properly in an airtight container at room temperature, these rolls stay soft for about 2 to 3 days. To extend freshness, you can freeze them for up to a month.When ready to eat, gently warm them in the oven or microwave to revive that fresh-baked softness.
Q5: Can these rolls be adapted for dietary preferences like vegan or dairy-free diets?
A: Yes! For dairy-free versions, swap the milk with plant-based alternatives like oat or almond milk, and replace butter with coconut oil or dairy-free margarine. Keep in mind that the texture might vary slightly, but the rolls will still be delightfully soft and sweet.
Q6: Are milk bread rolls suitable for both sweet and savory fillings?
A: Definitely! Their mild sweetness and tender crumb make fluffy milk bread rolls incredibly versatile. They shine as a breakfast treat with jam or honey but also pair wonderfully with savory fillings like creamy cheeses or hummus. The light texture complements a wide range of flavors without overpowering them.
Q7: What’s a common mistake to avoid when making milk bread rolls?
A: One pitfall is over-kneading or under-kneading the dough. Overworking can make the dough tough; underworking means it won’t develop enough gluten, resulting in dense rolls. Also, make sure your yeast is fresh and proofed correctly-poor fermentation leads to flat, heavy bread instead of fluffy rolls.
Q8: How can I achieve that classic shiny, golden crust on my milk bread rolls?
A: Brushing the rolls with an egg wash (a beaten egg or an egg mixed with a little water) before baking is customary for a glossy finish. If you prefer an egg-free option, a light brush of milk or melted butter right after baking will give a softer shine and subtle sheen.
Fluffy milk bread rolls combine simple ingredients with gentle care to create a truly comforting bread experience. Whether baked fresh for breakfast or enjoyed as a snack, their tender crumb and sweet notes make every bite pure bliss.
concluding Remarks
Whether enjoyed warm from the oven or paired with your favorite spread,fluffy milk bread rolls offer a delightful balance of softness and sweetness that’s simply hard to resist. Their pillowy texture and tender crumb make them a versatile companion to both savory and sweet dishes, elevating any meal or snack time. So next time you crave a comforting bite, remember that these gentle rolls are more than just bread-they’re a little everyday bakery magic waiting to be savored.